如何在本地Exchange Server中启用混合现代身份验证(HMA)?我们希望通过现代身份验证而不是基本身份验证来保护交换本地组织。这样,我们可以将MFA用于本地用户邮箱,而不仅可以用于云中的用户邮箱。在本文中,您将学习如何逐步配置混合现代身份验证,以交换本地。
介绍
我们有交换混合部署。大多数邮箱都在线交换,但我们确实有邮箱本地。这是因为公司政策。现在,我们已经拥有本地邮箱,我们希望用户可以通过现代身份验证进行身份验证,而不是默认的基本身份验证。
笔记:混合现代身份验证与高可用性(负载均衡)的单个Exchange服务器或Exchange Server效果很好。
混合现代身份验证先决条件
在开始配置混合现代身份验证之前,请确保您已经遵循以下步骤:
- 交换混合配置向导*
- 安装和配置Microsoft Entra Connect
- Exchange Server 2010不在组织中运行
- Exchange Server 2013/2016/2019安装了最新累积更新
*混合代理不支持混合现代身份验证。您将需要利用经典的交易所混合拓扑,并发布自动发现,EWS,Activesync,Mapi和OAB端点,用于混合现代身份验证,以与各种Outlook客户一起运行。
笔记:Exchange OWA(Outlook Web访问)和ECP(交换控制面板)可用于现代身份验证。但是,您需要2024年4月Exchange Server Hotfix更新或以后安装的Exchange Server 2019 CU14。
建议阅读:为Exchange Server配置Kerberos身份验证
我们建议您在交易服务器本地组织中启用现代身份验证,以保护Outlook客户,Exchange OWA和Exchange ECP。这意味着您需要安装Exchange Server 2019并使用最新版本。
混合现代身份验证图
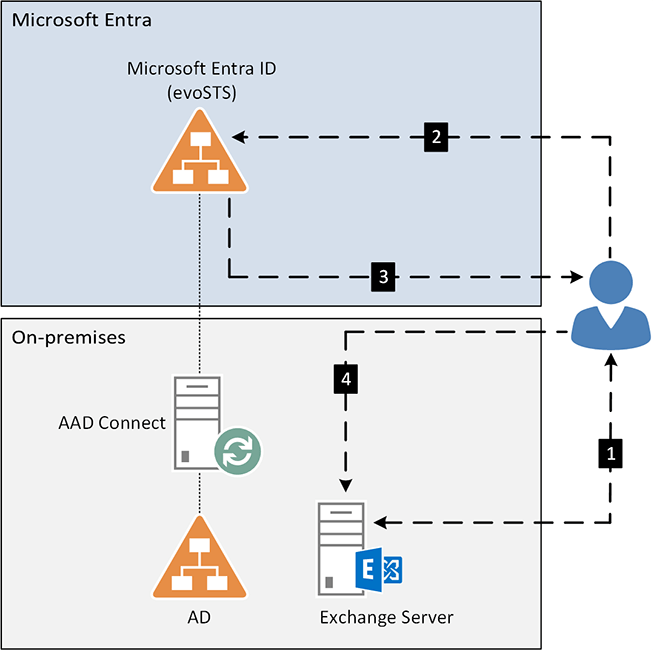
在下图中,您可以看到混合现代身份验证流程在实现后的外观。
- 具有本地邮箱的用户启动Outlook,并与Autododiscover连接到Exchange Server。连接将重定向到您设置的evosts URL。
- Outlook Client与Microsoft Entra ID联系,并出现现代身份验证提示。用户将使用为Exchange Online应用程序(Cloud App)设置的相同条件访问策略进行身份验证。
- 成功身份验证后,用户将获得访问令牌和刷新令牌。
- 用户提供了对本地Exchange Server的访问令牌,并可以访问邮箱。
现代身份验证的优势
在本地交易服务器中配置现代身份验证的优点是:
- 比基本身份验证更安全(经典用户名和密码)
- 从Microsoft Entra ID(中心位置)配置策略
- 最终用户体验的现代外观
如何配置混合现代身份验证
阿曼达(Amanda)有一个本地邮箱,我们可以验证她正在与Outlook Desktop应用程序中的基本身份验证联系,其中包括以下步骤:
- 开始Outlook
- 压低CTRL密钥和右键单击在Windows系统托盘中的Outlook客户端上
- 点击连接状态
在Authn(身份验证)列中,您将看到比*作为身份验证方案。这意味着您使用基本身份验证。
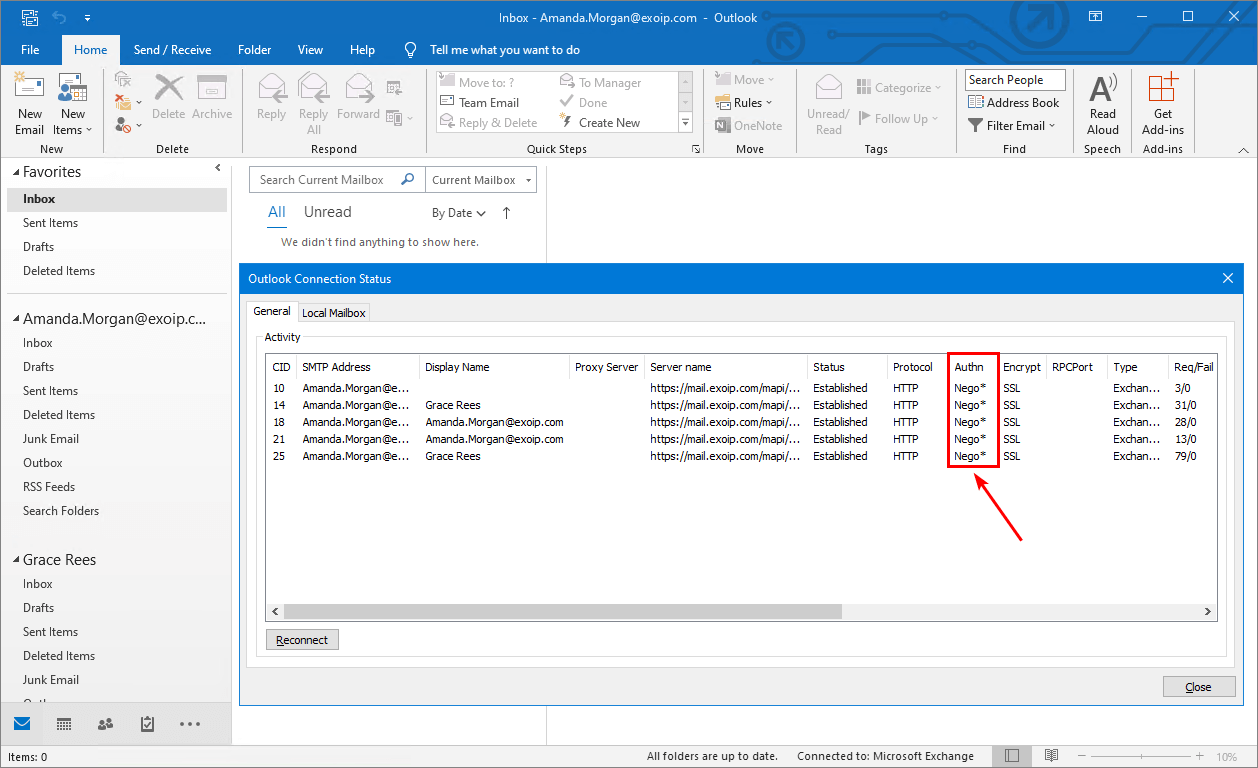
这authn列需要显示为持有人*。那是你知道的现代身份验证使用。
我们将仔细研究以下步骤,并确保在为本地组织启用混合现代身份验证之前,一切都已经到位。
每当您运行CMDLET时,请好看。那是因为您需要在以下方式执行管理任务
- Exchange Management Shell(Exchange Server本地)
- PowerShell(Microsoft Graph PowerShell)
步骤1。启用现代身份验证在线交换
在文章中阅读更多信息Microsoft 365中的现代身份验证。
要启用现代身份验证在线交换,请按照以下步骤:
- 登录到Microsoft 365管理中心
- 扩张设置然后单击组织设置
- 点击服务在顶级酒吧
- 选择现代身份验证从列表中
- 检查框将现代身份验证用于Windows和以后的Outlook 2013(建议)
- 点击节省
笔记:对于在2017年8月1日之前创建的租户,默认情况下,现代身份验证在线交易所和Skype在线上被关闭。

步骤2。获取虚拟目录URL
在本地交易服务器上启动Exchange Management Shell作为管理员。运行四个cmdlet检索虚拟目录URL。
Get-MapiVirtualDirectory | fl server,*url*
Get-WebServicesVirtualDirectory | fl server,*url*
Get-ClientAccessServer | fl Name, AutodiscoverServiceInternalUri
Get-OABVirtualDirectory | fl server,*url*
运行每个命令后,结果出现在下面的输出中。记下所有内部和外部URL,因为您需要在接下来的一个步骤中添加这些URL。
在我们的示例中,我们的内部和外部URL具有相同的名称。我们建议这样的配置,因为它可以简化很多。如果没有,您会看到输出中以.local或.lan结尾的内部地址。
# Get-MapiVirtualDirectory | fl server,*url*

Server      : EX01-2019
InternalUrl : https://mail.exoip.com/mapi
ExternalUrl : https://mail.exoip.com/mapi

Server      : EX02-2019
InternalUrl : https://mail.exoip.com/mapi
ExternalUrl : https://mail.exoip.com/mapi

# Get-WebServicesVirtualDirectory | fl server,*url*

Server               : EX01-2019
InternalNLBBypassUrl :
InternalUrl          : https://mail.exoip.com/EWS/Exchange.asmx
ExternalUrl          : https://mail.exoip.com/EWS/Exchange.asmx

Server               : EX02-2019
InternalNLBBypassUrl :
InternalUrl          : https://mail.exoip.com/EWS/Exchange.asmx
ExternalUrl          : https://mail.exoip.com/EWS/Exchange.asmx

# Get-ClientAccessServer | fl Name, AutodiscoverServiceInternalUri

WARNING:  The Get-ClientAccessServer cmdlet will be removed in a future version of Exchange. Use the
Get-ClientAccessService cmdlet instead. If you have any scripts that use the Get-ClientAccessServer cmdlet, update them
to use the Get-ClientAccessService cmdlet.  For more information, see https://go.microsoft.com/fwlink/p/?LinkId=254711.

Name                           : EX01-2019
AutoDiscoverServiceInternalUri : https://autodiscover.exoip.com/Autodiscover/Autodiscover.xml

Name                           : EX02-2019
AutoDiscoverServiceInternalUri : https://autodiscover.exoip.com/Autodiscover/Autodiscover.xml

# Get-OABVirtualDirectory | fl server,*url*

Server      : EX01-2019
InternalUrl : https://mail.exoip.com/OAB
ExternalUrl : https://mail.exoip.com/OAB

Server      : EX02-2019
InternalUrl : https://mail.exoip.com/OAB
ExternalUrl : https://mail.exoip.com/OAB
以管理员的身份运行PowerShell并连接到Microsoft Graph PowerShell。使用您的Microsoft 365全局管理员凭证登录。
Connect-MgGraph -Scopes "Application.Read.All", "Application.ReadWrite.All"运行Get-MgServicePrincipalCMDLET在应用程序中获取云中与交换相关的URL 00000002-0000-0FF1-CE00-000000000000。
Get-MgServicePrincipal -Filter "AppId eq '00000002-0000-0ff1-ce00-000000000000'" | select -ExpandProperty ServicePrincipalNames请注意(以及以后比较的屏幕截图)此命令的输出,其中应包括https://autodiscover.yourdomain.com和https://mail.yourdomain.com url,但主要由SPN组成,这些SPN以0000000002-0000-000-000-0FF1-CE00-CE00-00-0000000000 0000开头。
00000002-0000-0ff1-ce00-000000000000/mail.exoip.com
00000002-0000-0ff1-ce00-000000000000/autodiscover.exoip365.mail.onmicrosoft.com
00000002-0000-0ff1-ce00-000000000000/exoip365.mail.onmicrosoft.com
00000002-0000-0ff1-ce00-000000000000/autodiscover.exoip.com
00000002-0000-0ff1-ce00-000000000000/exoip.com
00000002-0000-0ff1-ce00-000000000000/autodiscover.exoip.local
00000002-0000-0ff1-ce00-000000000000/exoip.local
00000002-0000-0ff1-ce00-000000000000/outlook.office365.com
00000002-0000-0ff1-ce00-000000000000/mail.office365.com
00000002-0000-0ff1-ce00-000000000000/outlook.com
00000002-0000-0ff1-ce00-000000000000/*.outlook.com
00000002-0000-0ff1-ce00-000000000000
https://ps.compliance.protection.outlook.com
https://outlook-sdf.office.com/
https://outlook-sdf.office365.com/
https://outlook.office365.com:443/
https://outlook.office.com/
https://outlook.office365.com/
https://outlook.com/
https://ps.protection.outlook.com/
https://outlook-tdf.office.com/
https://outlook-tdf-2.office.com/
https://ps.outlook.com最有可能的是https:// urls从您的本地(步骤2)中丢失。因此,我们需要在下一步中将这些特定记录添加到此列表中。
步骤4。将本地Web服务URL添加为SPNS
如果您没有在此列表中看到内部和外部MAPI/HTTP,EWS,Activesync,OAB和Autodiscover记录,则必须在Microsoft Graph PowerShell中使用以下命令添加它们。
在此示例中,URL为https://mail.exoip.com/和https://autodiscover.exoip.com/。用您自己的URL替换URL。
$x = Get-MgServicePrincipal -Filter "AppId eq '00000002-0000-0ff1-ce00-000000000000'"
$x.ServicePrincipalNames += "https://mail.exoip.com/"
$x.ServicePrincipalNames += "https://autodiscover.exoip.com/"
Update-MgServicePrincipal -ServicePrincipalId $x.Id -ServicePrincipalNames $x.ServicePrincipalNames
假设您想恢复更改。更改下面的URL并运行命令。
$x = Get-MgServicePrincipal -Filter "AppId eq '00000002-0000-0ff1-ce00-000000000000'"
$x.ServicePrincipalNames = $x.ServicePrincipalNames | Where-Object { $_ -ne "https://mail.exoip.com/" -and $_ -ne "https://autodiscover.exoip.com/" }
Update-MgServicePrincipal -ServicePrincipalId $x.Id -ServicePrincipalNames $x.ServicePrincipalNames通过运行Get-MgServicePrincipalMicrosoft Graph PowerShell中的CMDLET。
Get-MgServicePrincipal -Filter "AppId eq '00000002-0000-0ff1-ce00-000000000000'" | select -ExpandProperty ServicePrincipalNames浏览输出。将前的列表/屏幕截图与新的SPN列表进行比较。您可能还会为您的记录屏幕截图。如果您成功了,您会在列表中看到两个新的URL。
按照我们的示例,SPN的列表现在包括特定的URL https://mail.exoip.com/和https://autodiscover.exoip.com/。在列表的顶部看到它。
https://autodiscover.exoip.com/
https://mail.exoip.com/
00000002-0000-0ff1-ce00-000000000000/mail.exoip.com
00000002-0000-0ff1-ce00-000000000000/autodiscover.exoip365.mail.onmicrosoft.com
00000002-0000-0ff1-ce00-000000000000/exoip365.mail.onmicrosoft.com
00000002-0000-0ff1-ce00-000000000000/autodiscover.exoip.com
00000002-0000-0ff1-ce00-000000000000/exoip.com
00000002-0000-0ff1-ce00-000000000000/autodiscover.exoip.local
00000002-0000-0ff1-ce00-000000000000/exoip.local
00000002-0000-0ff1-ce00-000000000000/outlook.office365.com
00000002-0000-0ff1-ce00-000000000000/mail.office365.com
00000002-0000-0ff1-ce00-000000000000/outlook.com
00000002-0000-0ff1-ce00-000000000000/*.outlook.com
00000002-0000-0ff1-ce00-000000000000
https://ps.compliance.protection.outlook.com
https://outlook-sdf.office.com/
https://outlook-sdf.office365.com/
https://outlook.office365.com:443/
https://outlook.office.com/
https://outlook.office365.com/
https://outlook.com/
https://ps.protection.outlook.com/
https://outlook-tdf.office.com/
https://outlook-tdf-2.office.com/
https://ps.outlook.com
步骤6。验证OAuth虚拟目录
现在,验证OAuth(现代身份验证)可以在Outlook可能使用的所有虚拟目录上的本地交换中正确启用。在Exchange Management Shell中运行CMDLET。
Get-MapiVirtualDirectory | fl server,*url*,*auth*
Get-WebServicesVirtualDirectory | fl server,*url*,*oauth*
Get-OABVirtualDirectory | fl server,*url*,*oauth*
Get-AutoDiscoverVirtualDirectory | fl server,*oauth*
运行每个命令后,结果出现在下面的输出中。
# Get-MapiVirtualDirectory | fl server,*url*,*auth*

Server                        : EX01-2019
InternalUrl                   : https://mail.exoip.com/mapi
ExternalUrl                   : https://mail.exoip.com/mapi
IISAuthenticationMethods      : {Ntlm, OAuth, Negotiate}
InternalAuthenticationMethods : {Ntlm, OAuth, Negotiate}
ExternalAuthenticationMethods : {Ntlm, OAuth, Negotiate}

Server                        : EX02-2019
InternalUrl                   : https://mail.exoip.com/mapi
ExternalUrl                   : https://mail.exoip.com/mapi
IISAuthenticationMethods      : {Ntlm, OAuth, Negotiate}
InternalAuthenticationMethods : {Ntlm, OAuth, Negotiate}
ExternalAuthenticationMethods : {Ntlm, OAuth, Negotiate}

# Get-WebServicesVirtualDirectory | fl server,*url*,*oauth*

Server               : EX01-2019
InternalNLBBypassUrl :
InternalUrl          : https://mail.exoip.com/EWS/Exchange.asmx
ExternalUrl          : https://mail.exoip.com/EWS/Exchange.asmx
OAuthAuthentication  : True

Server               : EX02-2019
InternalNLBBypassUrl :
InternalUrl          : https://mail.exoip.com/EWS/Exchange.asmx
ExternalUrl          : https://mail.exoip.com/EWS/Exchange.asmx
OAuthAuthentication  : True

# Get-OABVirtualDirectory | fl server,*url*,*oauth*

Server              : EX01-2019
InternalUrl         : https://mail.exoip.com/OAB
ExternalUrl         : https://mail.exoip.com/OAB
OAuthAuthentication : True

Server              : EX02-2019
InternalUrl         : https://mail.exoip.com/OAB
ExternalUrl         : https://mail.exoip.com/OAB
OAuthAuthentication : True

# Get-AutoDiscoverVirtualDirectory | fl server,*oauth*

Server              : EX01-2019
OAuthAuthentication : True

Server              : EX02-2019
OAuthAuthentication : True
如果任何服务器中缺少OAuth和四个虚拟目录中的任何一个,则需要在继续之前使用相关命令添加它:
- set-MapivirtualDirectory
- set-webservicesVirtualDirectory
- set-oabvirtualDirectory
- 设置AutodiscoverVirtualDirectory
步骤7。存在确认evosts auth服务器对象
返回本地交换管理外壳。运行CMDLET并验证您的本地具有evosts的条目(Microsoft Entra ID使用的安全令牌服务)身份验证提供商。
Get-AuthServer | Where-Object {$_.Name -like "EvoSts*"} | fl Name,DomainName,IssuerIdentifier,Realm,TokenIssuingEndpoint,Enabled,IsDefault*您的输出应显示一个具有姓名首先逃脱和启用国家价值应该是真的。如果您看不到这个,则应下载并运行混合配置向导的最新版本。
在我们的输出中,我们有两个evosts身份验证服务器。那是因为我们将本地配置为两个租户。
Name                           : EvoSts - 5af53ad5-4ce1-4406-bf3f-b8c796cf17b8
DomainName                     : {exoip365.onmicrosoft.com}
IssuerIdentifier               : https://sts.windows.net/fe15bfe6-36b2-4c9d-bf42-51b995f8e9af/
Realm                          : fe15bfe6-36b2-4c9d-bf42-51b995f8e9af
TokenIssuingEndpoint           : https://login.windows.net/common/oauth2/token
Enabled                        : True
IsDefaultAuthorizationEndpoint : False

Name                           : EvoSts - d1c9beac-0655-48e7-9949-5e497af1d38d
DomainName                     : {exoip.com}
IssuerIdentifier               : https://sts.windows.net/d032a20d-16c9-4e5b-87c3-30b055ded8cc/
Realm                          : d032a20d-16c9-4e5b-87c3-30b055ded8cc
TokenIssuingEndpoint           : https://login.windows.net/common/oauth2/token
Enabled                        : True
IsDefaultAuthorizationEndpoint : False
步骤8。启用混合现代身份验证
如果您有多个EXENTS ADENATICTICY服务器,则需要知道要将哪个设置为默认设置。在Microsoft Graph PowerShell中,运行CMDLET以检索组织ID。
Get-MgOrganization | select DisplayName, Id在我们的示例中,组织ID以D8CC结束。我们需要将Evosts设置为D1C9BEAC-0655-48E7-9949-5E497AF1D38D作为默认授权端点。
DisplayName Id
----------- --
EXOIP       d032a20d-16c9-4e5b-87c3-30b055ded8cc
在Exchange Management Shell中,运行两个CMDLET,以实现在本地组织交换的现代身份验证。
Set-AuthServer -Identity "EvoSts - d1c9beac-0655-48e7-9949-5e497af1d38d" -IsDefaultAuthorizationEndpoint $true
Set-OrganizationConfig -OAuth2ClientProfileEnabled $true
如果交易所本地版本是Exchange 2016(CU18或更高)或Exchange 2019(CU7或更高版本),以及Hybrid在2020年9月以后下载的HCW配置,请在Exchange Management Shell本地运行以下命令。
更改身份(从步骤7的复制),然后将域名更改为您自己。
Set-AuthServer -Identity "EvoSts - d1c9beac-0655-48e7-9949-5e497af1d38d" -DomainName "exoip.com" -IsDefaultAuthorizationEndpoint $true
Set-OrganizationConfig -OAuth2ClientProfileEnabled $true
步骤9。重新启动互联网信息服务
您可以在交换服务器上重新启动Internet信息服务(IIS),以加快流程。
iisreset步骤10。Outlook注册表要求
确保您拥有支持现代身份验证的以下Outlook客户端之一。 Outlook 2010不受支持,也无法正常工作。将Outlook客户端升级到支持现代身份验证的版本。
| Outlook版本 | 现代验证支持 | Enableadal Reg键需要 | 需要ewaysemsoauthforautododiscover键 |
|---|---|---|---|
| Outlook 2010 | 不 | 无法使用 | 无法使用 |
| Outlook 2013 | 是的 | 是的 | 是的 |
| Outlook 2016 | 是的 | 不 | 是的 |
| Outlook 2019 | 是的 | 不 | 是的 |
| Outlook 365 | 是的 | 不 | 是的 |
微软建议用户强迫Outlook通过设置现代身份验证dword以下注册表密钥的值1。
HKEY_CURRENT_USERSoftwareMicrosoftExchangeAlwaysUseMSOAuthForAutoDiscover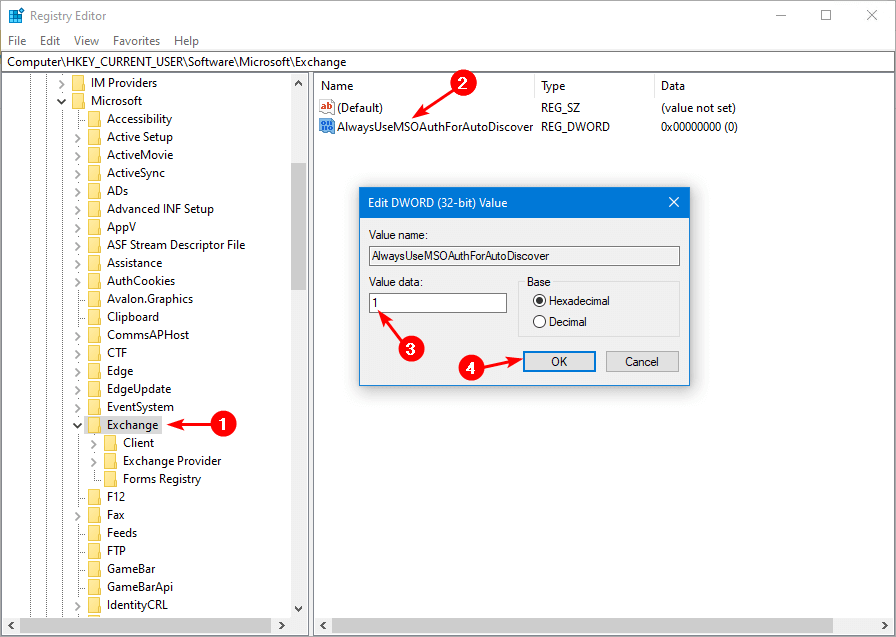
如果您有Outlook 2013,则需要再添加两个dword值。添加dword价值1在以下注册表子键:
HKEY_CURRENT_USERSOFTWAREMicrosoftOffice15.0CommonIdentityEnableADAL
HKEY_CURRENT_USERSOFTWAREMicrosoftOffice15.0CommonIdentityVersion
步骤11。验证您的工作
启用混合现代身份验证后,客户的下一个登录将使用新的验证流。请注意,仅仅打开混合现代身份验证不会触发任何客户的重新验证,并且可能需要一段时间才能进行新的设置。这就是为什么冰淇淋在上一步中的Exchange服务器上将加快速度。
你可以按住CTRL密钥和右键单击Windows系统托盘中的Outlook客户端。点击连接状态。寻找客户的SMTP地址持有人*,代表Oauth中使用的承载令牌。
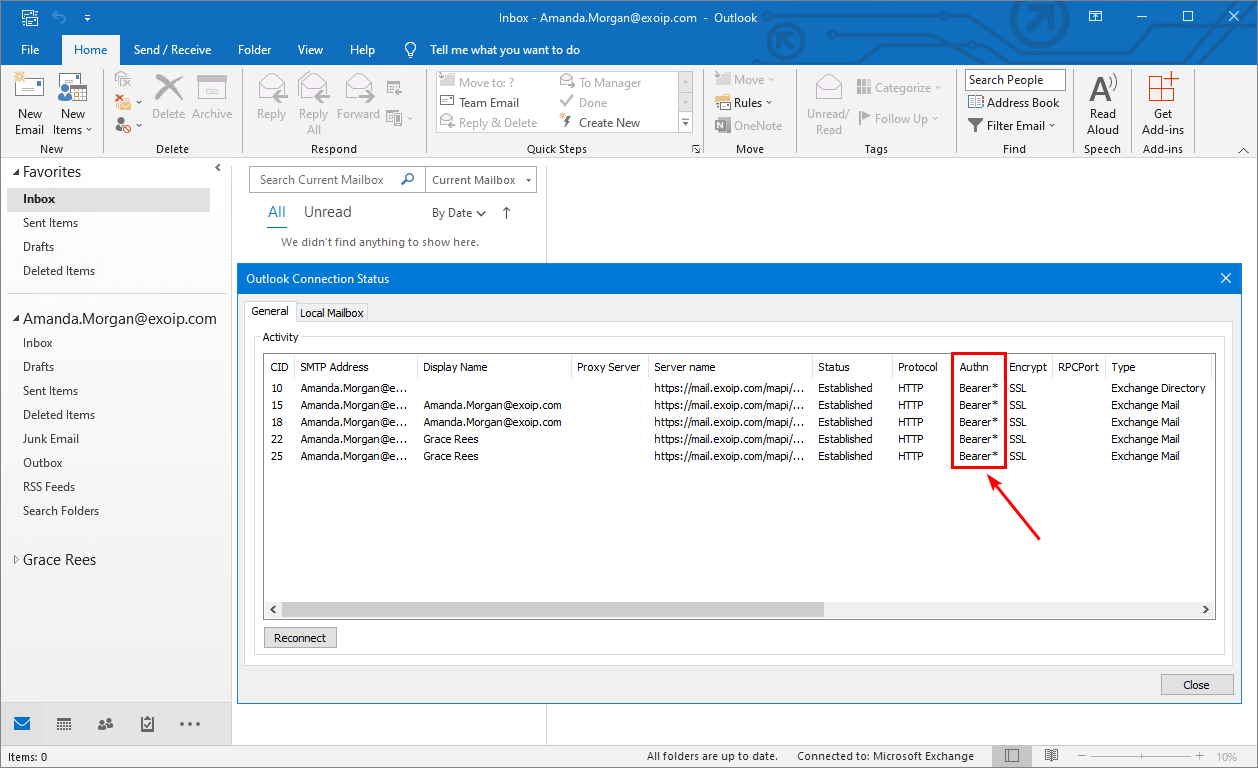
您确实在交换本地组织中成功配置了混合现代身份验证。
如何为OWA和ECP配置混合现代身份验证
重要的是,您要经历上一步,并且在开始为OWA和ECP配置混合现代身份验证之前,一切都起作用。
重要的:Exchange OWA(Outlook Web访问)和ECP(交换控制面板)可用于现代身份验证。但是,您需要2024年4月Exchange Server Hotfix更新或以后安装的Exchange Server 2019 CU14。
这就是导航到本地Exchange Owa时的外观。这意味着HMA未为OWA和ECP配置。
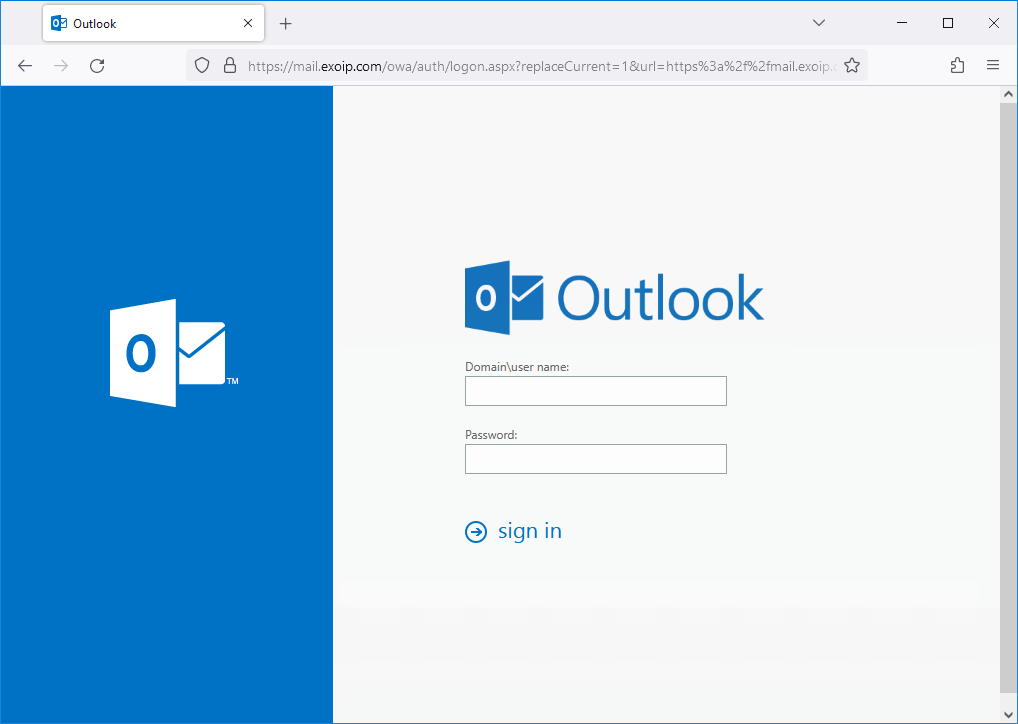
OWA和ECP页面需要显示Microsoft登录到Outlook屏幕。那是您知道使用现代身份验证的时候。
我们将仔细研究以下步骤,并确保在为OWA和ECP启用混合现代身份验证之前,确保一切都到位。
每当您运行CMDLET时,请好看。那是因为您需要在以下方式执行管理任务
- Exchange Management Shell(Exchange Server本地)
- PowerShell(Microsoft Graph PowerShell)
步骤1。获取OWA和ECP URL
在本地交易服务器上启动Exchange Management Shell作为管理员。运行两个CMDLET以检索OWA和ECP虚拟目录URL。
Get-OwaVirtualDirectory -ADPropertiesOnly | fl server, name, *url*
Get-EcpVirtualDirectory -ADPropertiesOnly | fl server, name, *url*
运行每个命令后,结果出现在下面的输出中。记下所有内部和外部URL,因为您需要在接下来的一个步骤中添加这些URL。
在我们的示例中,我们的内部和外部URL具有相同的名称。我们建议这样的配置,因为它可以简化很多。如果没有,您会看到输出中以.local或.lan结尾的内部地址。
# Get-OwaVirtualDirectory -ADPropertiesOnly | fl server, name, *url*

Server                  : EX01-2019
Name                    : owa (Default Web Site)
Url                     : {}
InternalSPMySiteHostURL :
ExternalSPMySiteHostURL :
SetPhotoURL             :
Exchange2003Url         :
FailbackUrl             :
InternalUrl             : https://mail.exoip.com/owa
ExternalUrl             : https://mail.exoip.com/owa

Server                  : EX02-2019
Name                    : owa (Default Web Site)
Url                     : {}
InternalSPMySiteHostURL :
ExternalSPMySiteHostURL :
SetPhotoURL             :
Exchange2003Url         :
FailbackUrl             :
InternalUrl             : https://mail.exoip.com/owa
ExternalUrl             : https://mail.exoip.com/owa

# Get-EcpVirtualDirectory -ADPropertiesOnly | fl server, name, *url*

Server      : EX01-2019
Name        : ecp (Default Web Site)
InternalUrl : https://mail.exoip.com/ecp
ExternalUrl : https://mail.exoip.com/ecp

Server      : EX02-2019
Name        : ecp (Default Web Site)
InternalUrl : https://mail.exoip.com/ecp
ExternalUrl : https://mail.exoip.com/ecp
步骤2。添加本地OWA和ECP URL作为回复URL
以管理员的身份运行PowerShell并连接到Microsoft Graph PowerShell。使用您的Microsoft 365全局管理员凭证登录。
Connect-MgGraph -Scopes "User.Read", "Application.ReadWrite.All"使用以下Microsoft Graph PowerShell中的命令将您的Exchange Server本地OWA和ECP URL添加到应用程序回复URL。
在此示例中,URL为https://mail.exoip.com/owa和https://mail.exoip.com/ecp。用您自己的URL替换URL。
$servicePrincipal = Get-MgServicePrincipal -Filter "AppId eq '00000002-0000-0ff1-ce00-000000000000'"
$servicePrincipal.ReplyUrls += "https://mail.exoip.com/owa"
$servicePrincipal.ReplyUrls += "https://mail.exoip.com/ecp"
Update-MgServicePrincipal -ServicePrincipalId $servicePrincipal.Id -AppId "00000002-0000-0ff1-ce00-000000000000" -ReplyUrls $servicePrincipal.ReplyUrls
假设您想恢复更改。更改下面的URL并运行命令。
$servicePrincipal = Get-MgServicePrincipal -Filter "AppId eq '00000002-0000-0ff1-ce00-000000000000'"
$servicePrincipal.ReplyUrls = $servicePrincipal.ReplyUrls | Where-Object { $_ -ne "https://mail.exoip.com/owa" -and $_ -ne "https://mail.exoip.com/ecp" }
Update-MgServicePrincipal -ServicePrincipalId $servicePrincipal.Id -ReplyUrls $servicePrincipal.ReplyUrls
步骤3。验证交换回复URL
验证您将Exchange Server OWA和ECP URL添加到应用程序回复URL中。运行Get-MgServicePrincipalMicrosoft Graph PowerShell中的CMDLET。
(Get-MgServicePrincipal -Filter "AppId eq '00000002-0000-0ff1-ce00-000000000000'").ReplyUrls按照我们的示例,现在的URL列表现在包括特定的URL https://mail.exoip.com/owa和https://mail.exoip.com/ecp。在列表的顶部看到它。
https://mail.exoip.com/ecp
https://mail.exoip.com/owa
https://outlook.cloud.microsoft
https://outlook-sdf.cloud.microsoft
https://sdfpilot.outlook.com/owa
步骤4。设置全球覆盖以供下载域
如果您在Exchange服务器上配置了下载域,则仅在一个Exchange Server上运行以下在Exchange Management Shell中。如果没有,请跳过此步骤。
New-SettingOverride -Name "OWA HMA Download Domain Support" -Component "OAuth" -Section "OAuthIdentityCacheFixForDownloadDomains" -Parameters ("Enabled=true") -Reason "Enable support for OWA HMA when Download Domains are in use"
Get-ExchangeDiagnosticInfo -Process Microsoft.Exchange.Directory.TopologyService -Component VariantConfiguration -Argument Refresh
Restart-Service -Name W3SVC, WAS -Force
步骤5。获取虚拟目录身份验证方法状态
在Exchange Management Shell中运行CMDLET,以检索OWA和ECP虚拟目录身份验证方法状态。
Get-OwaVirtualDirectory -Server "EX01-2019" | fl server, *auth*
Get-EcpVirtualDirectory -Server "EX02-2019" | fl server, *auth*
运行每个命令后,结果出现在下面的输出中。
# Get-OwaVirtualDirectory -Server "EX01-2019" | fl server, *auth*

Server                        : EX01-2019
ClientAuthCleanupLevel        : High
InternalAuthenticationMethods : {Basic, Fba, Adfs}
BasicAuthentication           : True
WindowsAuthentication         : False
DigestAuthentication          : False
FormsAuthentication           : True
LiveIdAuthentication          : False
AdfsAuthentication            : False
OAuthAuthentication           : False
ExternalAuthenticationMethods : {Fba}

# Get-EcpVirtualDirectory -Server "EX01-2019" | fl server, *auth*

Server                        : EX01-2019
InternalAuthenticationMethods : {Basic, Fba, Adfs}
BasicAuthentication           : True
WindowsAuthentication         : False
DigestAuthentication          : False
FormsAuthentication           : True
LiveIdAuthentication          : False
AdfsAuthentication            : True
OAuthAuthentication           : False
ExternalAuthenticationMethods : {Fba}
步骤6。关于OWA和ECP的禁用身份验证方法
禁用每个Exchange服务器上OWA和ECP虚拟目录的任何其他身份验证方法。在Exchange Management Shell中运行命令。
Get-OwaVirtualDirectory -Server "EX01-2019" | Set-OwaVirtualDirectory -AdfsAuthentication $false -BasicAuthentication $false -FormsAuthentication $false -DigestAuthentication $false
Get-EcpVirtualDirectory -Server "EX01-2019" | Set-EcpVirtualDirectory -AdfsAuthentication $false -BasicAuthentication $false -FormsAuthentication $false -DigestAuthentication $false
Get-OwaVirtualDirectory -Server "EX02-2019" | Set-OwaVirtualDirectory -AdfsAuthentication $false -BasicAuthentication $false -FormsAuthentication $false -DigestAuthentication $false
Get-EcpVirtualDirectory -Server "EX02-2019" | Set-EcpVirtualDirectory -AdfsAuthentication $false -BasicAuthentication $false -FormsAuthentication $false -DigestAuthentication $false
步骤7。启用OWA和ECP的混合现代身份验证
在每个Exchange Server上启用OAuth的OAuth和ECP虚拟目录。在Exchange Management Shell中运行命令。
Get-EcpVirtualDirectory -Server "EX01-2019" | Set-EcpVirtualDirectory -OAuthAuthentication $true
Get-OwaVirtualDirectory -Server "EX01-2019" | Set-OwaVirtualDirectory -OAuthAuthentication $true
Get-EcpVirtualDirectory -Server "EX02-2019" | Set-EcpVirtualDirectory -OAuthAuthentication $true
Get-OwaVirtualDirectory -Server "EX02-2019" | Set-OwaVirtualDirectory -OAuthAuthentication $true
步骤8。验证您的工作
应用上述配置后,您无需重新启动IIS或Exchange Server即可生效更改。
笔记:确保您的管理员帐户与Microsoft Entra ID同步;否则,您将无法登录ECP。默认管理员帐户将不会与Microsoft Entra ID同步,也不能使用它登录。无论如何,您应在生产环境中禁用默认管理员帐户以减少攻击表面。
打开Web浏览器并填写Exchange Server OWA或ECP URL。您将立即看到Microsoft登录到Outlook屏幕。

填写凭据后,您将被重定向到Exchange Server本地OWA或ECP URL。
您确实在交易所内部组织中成功地为OWA和ECP配置了混合现代身份验证。
就是这样!
结论
您学会了如何配置混合现代身份验证以交换本地。请按照在线和交换本地交换之间配置OAuth的步骤。设置后,Outlook客户端和OWA/ECP都受到保护。
您喜欢这篇文章吗?迁移到Office 365后,您可能还喜欢Outlook提示以获取密码。不要忘记关注我们并分享本文。